References:
If you want to use your sketch later as a modelling reference, you should use a simple T-pose however. Now you should start painting a little bit over your patchwork. If you have access to a pentablet, grab it and use photoshop, painter or similar to do it. It's really fun to use a pentablet - give it a try if you have this opportunity. If not, print out your patchwork with very low opacity and use pencils or whatever drawing tools you have to draw over it. It doesn't have to be very clean - but once you found some proportions you like you should draw them with some sharp outlines. Give it also some colors and shading if you like (start with constant color areas and add shadows on top of it) Scan it in when you're done. Create at least a side or frontview of your object before you start modeling. Of course it's better to have both of them - you will feel much more confident when moving into 3D space if you know your boundaries in all directions.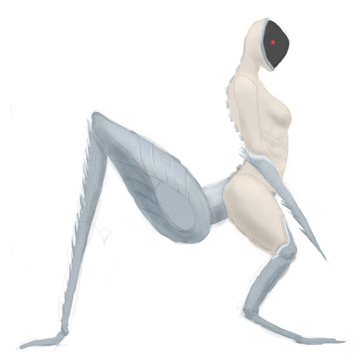

 It's also time now to think about the edge-flow of your object. You don't have to sketch every single polygon - but drawing some of the main lines of the later topology - especially in difficult areas where different edgeflows meet each other - is much easyer done in 2D than it is in 3D. A good Edgeflow is the key to create a high-quality model. It affects not only how nicely it will animate later, but also the shading, the polycount and most important the creation process itself. A model with a nice edge-flow will be much easyer to tweak, extend and smooth out. When planning the edgeflow, keep your target polycount in mind. Consider this mini-tutorial on modeling shoulders:
  A good and short tutorial on planning your edgeflow (not only valuable for faces) you can find here: http://www.3dtotal.com/team/Tutorials/edge_loops/edge_loops_01.asp

The box on the left has one large polygon. If you don't use per-pixel lighting, you won't get very accurate shading.
The box in the middle is subdivided in a clean fashion. There are more polygons but also more accurate shading.
The box on the right is also subdivided, but in a chaotic fashion. Even though the top of the box is flat, the shading looks odd.
(these hints do not apply if you're going to use perpixel lighting techniques like normalmaping for your model)
If you intend to create an animatable character check out these two tutorials to learn about how to model limbs for animation: http://www.pig-brain.com/tut02/tut02_01.htm http://www.poopinmymouth.com/process/tips/limb_deformations.gif If you intend to create vehicles or maschines, don't miss this paper:

http://neo.cycovery.com/lowpoly_techniques.pdf These targets usually contradict each other. Fewer chunks mean more texture distortion and vice versa so it can be a difficult task to get a good UV layout
Check out these tutorials:
These targets usually contradict each other. Fewer chunks mean more texture distortion and vice versa so it can be a difficult task to get a good UV layout
Check out these tutorials:
for 3dsmax: http://www.3dtotal.com/ffa/tutorials/max/UVW_mapping_an_object/UVW_mapping_an_object1.asp
for XSI: http://www.finalgathering.com/tut/texture/te.html
for Maya: http://www.3dtotal.com/ffa/tutorials/maya/chris_kniffen/chris_kniffen1.asp
- Poopinmymouth tutorials: http://www.poopinmymouth.com/
Creating the Art of the Game
Step 1: Sketching
This is basically the most significant step in the creation process but most often gets the least attention. It is very important that you have a clear idea of what you are going to create, so you should take your time and develop your idea! Expect to work several hours on one sketch (and don't give up and threw the concept away too early! work with it, let it evolve). The more you bring to paper now, the easier your life will be later on! Not only will you and your teammates have the same idea of what your gamecontent is going to look, it will also be your lifeline on which you can orientate yourself when you get lost during the later steps (you will!). How you do it? It doesn't matter what medium you choose. and you don't have to be a good artist to create something useful. A good start often is to use some photoreferences to create a rough sideview of your object. Cut them out and create a patchwork - that way a you quickly create the shapes and proportions for a sci-fi hovertank from fotos of an old VW Golf and a drilling machine. Or you take your beach fotos and photos of construction machines to create a postapocalyptic cyborg. If you're going to create a humanoid character, you'll find some referencephotos here http://www.fineart.sk/ or interesting poses here http://www.posemaniacs.com/If you want to use your sketch later as a modelling reference, you should use a simple T-pose however. Now you should start painting a little bit over your patchwork. If you have access to a pentablet, grab it and use photoshop, painter or similar to do it. It's really fun to use a pentablet - give it a try if you have this opportunity. If not, print out your patchwork with very low opacity and use pencils or whatever drawing tools you have to draw over it. It doesn't have to be very clean - but once you found some proportions you like you should draw them with some sharp outlines. Give it also some colors and shading if you like (start with constant color areas and add shadows on top of it) Scan it in when you're done. Create at least a side or frontview of your object before you start modeling. Of course it's better to have both of them - you will feel much more confident when moving into 3D space if you know your boundaries in all directions.
It's also time now to think about the edge-flow of your object. You don't have to sketch every single polygon - but drawing some of the main lines of the later topology - especially in difficult areas where different edgeflows meet each other - is much easyer done in 2D than it is in 3D. A good Edgeflow is the key to create a high-quality model. It affects not only how nicely it will animate later, but also the shading, the polycount and most important the creation process itself. A model with a nice edge-flow will be much easyer to tweak, extend and smooth out. When planning the edgeflow, keep your target polycount in mind. Consider this mini-tutorial on modeling shoulders:
A good and short tutorial on planning your edgeflow (not only valuable for faces) you can find here: http://www.3dtotal.com/team/Tutorials/edge_loops/edge_loops_01.asp
Step 2: Modelling
Choose your 3D package. There are different products available and most of them feature fully functional 30 day trials as well as student versions. You should choose the application you already got in contact with or for which you have friends using it who you can ask when having troubles. All of them are good! My recommendation is Softimage|XSI for modelling and unwrapping because of it's fast workflow and 3dsmax for rigging, animation and texturebaking. But that's only personal preference. If you are completely new to 3D modelling, you first should do some of the tutorials shipping with the 3d package to get common with the specific user interface. Most 3d applications feature tutorials that don't look very interesting but give you a solid understanding of the workflow and most used tools. Focus on poly modelling. If you've already got some modelling experience, you should focus now on lowpoly modelling. Lowpoly modelling does NOT mean to have as less polygons as possible but rather to get the maximum out of your poly-count. You're not going to use Subdivision techniques or NURBS or Splinecages to create your model. Most of the time you'll model Poly-by-Poly and use texturetechniques to create most of the details. Check out this tutorial for lowpoly character modeling: http://www.3dtotal.com/team/tutorials/knut1/knut_pilot_01.asp When modeling always keep in mind some strategies for the polygon density. you need more polygons in areas where:- there are more details (character faces sometimes have as many polygons as the rest of the body)
- there is stronger curvature (try to keep the polygon-edges follow the curvature as well as flowing perpendicular to the curvature. Avoid edges that flow diagonal to the curvature!)
- there will be animation (joints need more polygons than upper arms for example)
- never sacrifice a clean edgeflow in favour of some polygons which could be removed.
- avoid flat large areas without any vertices since vertices are also important for shading. consider the following image:
The box on the left has one large polygon. If you don't use per-pixel lighting, you won't get very accurate shading.
The box in the middle is subdivided in a clean fashion. There are more polygons but also more accurate shading.
The box on the right is also subdivided, but in a chaotic fashion. Even though the top of the box is flat, the shading looks odd.
(these hints do not apply if you're going to use perpixel lighting techniques like normalmaping for your model)
If you intend to create an animatable character check out these two tutorials to learn about how to model limbs for animation: http://www.pig-brain.com/tut02/tut02_01.htm http://www.poopinmymouth.com/process/tips/limb_deformations.gif If you intend to create vehicles or maschines, don't miss this paper:
http://neo.cycovery.com/lowpoly_techniques.pdf
Step 3: Unwrapping
After you created your 3D model you have to unwrap it in order to texture it later on. Unwrapping can be one of the most annoying tasks but puting some effort in here will make the texturing process easier and there will be less texture distortions and visible texture seams. The process is different in every 3D package - so do the tutorials of your application first - but the problems are always the same: "Unfold" your 3D mesh onto a 2D UV plane so that the following requirements are met:- keep texture distortions on a minimum (texture distortions happen when the shape of an unfoldet polygon in the UV plane differs a lot from the shape of the corresponding 3D polygon)
- create as few chunks (continuous clusters of polygons in the UV plane) as possible
- place chunkborders at obscured places on the model (because there can be visible seams along these borders)
- use as much texturespace as possible (a given texture will always use the same ammount of video-memory, independent of how much percentage of the texture is visible on the model so you should use and reuse as many texels as possible!)
These targets usually contradict each other. Fewer chunks mean more texture distortion and vice versa so it can be a difficult task to get a good UV layout
Check out these tutorials:for 3dsmax: http://www.3dtotal.com/ffa/tutorials/max/UVW_mapping_an_object/UVW_mapping_an_object1.asp
for XSI: http://www.finalgathering.com/tut/texture/te.html
for Maya: http://www.3dtotal.com/ffa/tutorials/maya/chris_kniffen/chris_kniffen1.asp
Step 4: Creating Textures
There are basically two ways to create textures for a model:- creating them by hand (painting, using photos and so on)
- baking them using a raytracer
Step 5: Rigging & Skinning
Step 6: Animation
Special 1: Highres, Sculpting & Normalmapping
| I | Attachment | History | Action | Size | Date | Who | Comment |
|---|---|---|---|---|---|---|---|
| |
design2_pose_small.jpg | r1 | manage | 15.7 K | 2008-02-25 - 16:27 | UnknownUser | |
| |
texture_usage.jpg | r1 | manage | 220.6 K | 2008-02-25 - 22:28 | UnknownUser | |
| |
ulala.jpg | r1 | manage | 24.9 K | 2008-02-25 - 16:27 | UnknownUser | |
| |
ulala_no_color.jpg | r1 | manage | 18.4 K | 2008-02-25 - 16:28 | UnknownUser | |
| |
vehicle.jpg | r1 | manage | 28.3 K | 2008-02-25 - 17:41 | UnknownUser | |
| |
vertex_shading.jpg | r1 | manage | 36.0 K | 2008-02-25 - 22:57 | UnknownUser |