Supplementary files for the classroom content creation tutorial
Check out the ContentCreation page to get more detailed information on the different steps.You'll find links to download the used 3D software on the twiki mainpage (bottom)
If this is the first time you're using this software, you probably won't be able to follow all steps without F1! (but give it a try
 )
)
Step 1: Sketching
Here's the photoshop file of the sketch. I also add it as JPEG which will at the same time be the texture for the reference planes (side and frontview) in the XSI file.- character_sketch.psd: photoshop file of the character sketch
- character sketch. texture for reference planes:

Step 2: Modelling
- monster_modeling_start.scn: XSI (6.02) Scene file to start modeling
Step 3: Unwrapping
If you open the file from step two, the bottomright viewport shows all the objects in your scene. There are some hidden ones. You can select them and press 'H' to unhide them. Select the monster_modelingcomplete and unhide it. While still selected, you can choose from the lefthand menu in the 'Get' Panel the Property->Texture Projection -> YZ. By this you create a planar Texture projection for the mesh. Press now (while still selected) Alt+7 to open the Texture editor. Here you can select subregions of the mesh and apply other projection types to them. Try to create a side-planar projection for the body, a front-planar projection for the eye and a bottom-down projection for the foot.Step 4: Creating Textures
Still in the Texture Editor, select from the menue Clips->Import Clip and load a completely black picture (for example in size 512x512) - then choose Edit->Stamp UV Mesh to export the UV sheet as a reference picture to draw your texture. If you didn't do the previous steps, you can unhide the 'monster_unwrapped_complete' model and use the following UV_stamp as reference texture to draw the Texture on it. If you google (images) for 'eye texture' you will find plenty of different eye textures. I add here the one i googled. In photoshop, just make the body a constant color first and then add dark and bright spots with a soft brush at a low opacity. if you play egoshooter games on your computer, you can do this maybe even with a regular mouse instead of a pen tablet.
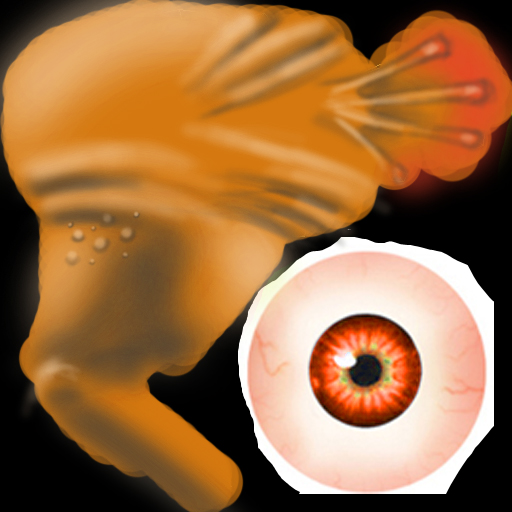
- eye texture found by google image search for 'eye texture' :):

- UV_stamp for the 'monster_unwrapped_complete' mesh:

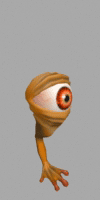
- texture that fits the 'monster_unwrapped_complete' mesh as well as the mesh in the 3D Studio Max file:
Step 5: Rigging & Skinning
- rigging_start.max: 3dsmax (2008) file containing the monster
- rigging_animated.max: rigged, skinned and animated monster
Step 6: Export
Get the Pandasoft exporter from http://www.andytather.co.uk/Panda/directxmax.aspx It's a freeware .X exporter. If you're using 3dsmax, better don't even bother trying to use the .fbx file format. In 3dsmax, choose file->export and export to the .x format. Make sure that you export animations! you have to check the box in the '3Ds Max Objects' tab as well as set the options in the 'Animation' tab to 'sampled', 'matrix' as well as '3Ds Max Ticks'Step 7: get it into XNA
Download the Skinned Model Sample from http://creators.xna.com/Headlines/developmentaspx/archive/2007/01/01/Skinned-Model-Sample.aspx add the monster to the content. Make sure to change the content processor in the properties of the asset to SkinnedModelProcessor! In the SkinningSample.cs class, go to the 'Initialisation' and change the loaded model as well as the name of the animation track. The name is set in the Pandasoft exporter and is "Anim-1" by default.| I | Attachment |
History | Action | Size | Date | Who | Comment |
|---|---|---|---|---|---|---|---|
| |
character_sketch.jpg | r1 | manage | 300.9 K | 2008-03-18 - 19:45 | UnknownUser | character sketch. texture for reference planes |
| |
character_sketch.psd | r1 | manage | 2174.5 K | 2008-03-18 - 19:42 | UnknownUser | photoshop file of the character sketch |
| |
eyes.jpg | r1 | manage | 26.6 K | 2008-03-18 - 20:44 | UnknownUser | eye texture found by google for 'eye texture' |
| |
jump.gif | r1 | manage | 176.6 K | 2008-03-18 - 21:25 | UnknownUser | |
| |
monster_modeling_start.scn | r1 | manage | 442.5 K | 2008-03-18 - 19:58 | UnknownUser | XSI (6.02) Scene file to start modeling |
| |
rigging_animated.max | r1 | manage | 428.0 K | 2008-03-18 - 21:02 | UnknownUser | rigged, skinned and animated monster |
| |
rigging_start.max | r1 | manage | 296.0 K | 2008-03-18 - 20:53 | UnknownUser | 3dsmax (2008) file containing the monster |
| |
texture.jpg | r1 | manage | 131.3 K | 2008-03-18 - 20:46 | UnknownUser | texture that fits the 'monster_unwrapped_complete' mesh as well as the mesh in the 3D Studio Max file |
| |
uv_stamp.jpg | r1 | manage | 230.4 K | 2008-03-18 - 20:46 | UnknownUser | UV_stamp for the 'monster_unwrapped_complete' mesh |